Paperless-ng workflow with Hazel and SCP
Overview
I selfhost Paperless-ng on my local network on a Raspberry Pi. I wanted to be able to just drop documents into a folder on my Mac or iPhone and let automation take care of the rest.
Paperless-ng monitors a folder on the Pi and will automatically import and OCR documents that are placed inside it. All I need to do is get the documents from my Mac or iOS device into that folder. To do this I have Hazel monitoring an iCloud folder on my Mac - if any document is placed in this folder it is copied to the Pi using Secure Copy Protocol (SCP).
Automation flow diagram for this Paperless-ng workflow
Setup
Step 1. Setup your Paperless-ng to monitor a folder
I have my Paperless-ng setup to monitor a folder called consume. This is the folder it monitors by default. If you want to change this visit the setup docs. Make a note of path to the consume directory. For example mine is /home/pi/Docker/paperless-ng/consume.
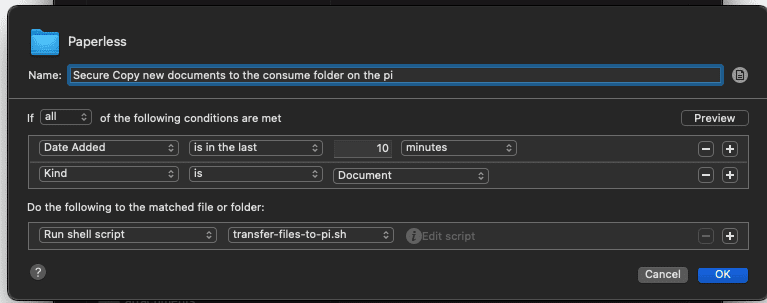
Step 2. Create a shell script that copies files from your Mac to the consume folder
This script takes in a variable ($1) which represents the filename of the matching file. It then copies this file to the directory you noted in Step 1. Hazel will then pass in the filename variables ($1) into this script.
1#!/bin/zsh
2
3
4scp $1 pi@raspberrypi.local:/home/pi/Docker/paperless-ng/consume
5rm $1
6exit 0
Here raspberrypi.local is the hostname or ip address of your device running Paperless-ng. I recommend using ssh keys for security and to make life easier too (I won't go into that here).
When Hazel runs a shell script it will pass a parameter into it - this will be the path to the file that it has matched. We use this file ($1) initially in the scp command - which will copy the file to your consume folder on your Pi.
We then delete the file with rm $1 - if you don't want to delete the file after copying make sure you delete this line.
Step 3. Setup hazel to watch an iCloud folder on your Mac.
If we setup Hazel to monitor an iCloud folder it means that this automation becomes more flexible and useful. Any file you add to this folder whether from your Mac, your iPhone or your iPad (or even iCloud web) will end up being processed. Setup your Hazel rule to match files dropped in this iCloud folder and then run the script you created in Step 2.
You could also use another file sync utility such as Dropbox.
Step. 4. Let it run.
Drop your files into the folder and kick back whilst Paperless-ng processes your documents.